Effective Listening Tests
by Pat Brown
The human ear/brain system remains one of the best comparators for assessing the differences between audio devices although it can be deceived. Pat Brown provides a solution.
Given the amazing instrumentation available to the modern audio practitioner, one would think that listening tests have gone the way of the woolly mammoth. Surely instrumentation should be better than human hearing. Of course, this isn’t the case. The human ear/brain system remains one of the best comparators for assessing the differences between audio devices. Given the fact that it is tied to the other senses, it is also easily deceived. Listening tests have some major shortcomings that must always be considered. These include:
- 1. The ear/brain system is not calibrated. It cannot tell me the exact level that I am being exposed to. An instrument can.
- 2. It is not consistent. Listener fatigue changes our subjective impression over time.
- 3. It lacks an absolute reference. The ear/brain system can effectively tell me that there is a difference between two devices, but it cannot tell me which one is the most accurate. Sound “quality” and “accuracy” are not necessarily the same, since quality is subjective and accuracy is objective.
These limitations can severely influence the validity of listening tests for drawing conclusions about which device being compared is “best.” There is another, equally significant limitation to forgoing the instruments and just using your ears. Program material is not consistent over time. You can’t just play a song and switch between Device A and Device B. All aspects of the recording have the same limitation as the ear/brain system – neither music nor speech is calibrated or consistent.
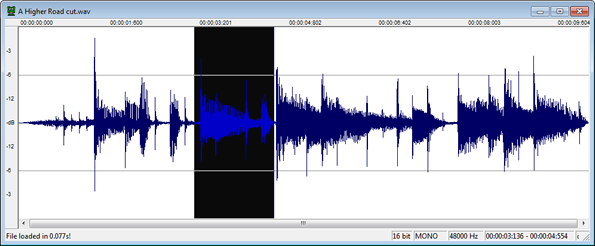
A work-around is to use a wave editor as the program source, and select a small segment of a track to “Repeat” or “Loop.” All modern wave editors have this capability (Fig. 1). You can copy and paste to a new file to add some silence to the beginning and end to allow time to switch between devices. I like to keep the time length to a few seconds at most, else my brain loses the reference.
Figure 1 – A wave file segment selected for looping (www.wavosaur.com)
A Scientific Kick Drum
An excellent low frequency program source for listening tests is a kick drum. The very high crest factor waveform can really stress a subwoofer, and challenge the peak output capability of a power amplifier. There are many types of kick drums, and they all sound different. Here’s where science can come to the rescue. I used Adobe Audition to produce a pulse train at various repetition rates. It sounds like a nice, tight kick drum, and it is perfectly repeatable. I have made three versions available for download.
- 1. 2 s repetition rate (0.5 Hz)
- 2. 1 s repetition rate (1 Hz)
- 3. 0.5 s repetition rate (2 Hz)
The pulses have very wide spectral content, and are 0 dBFS. Be CAREFUL when applying these to loudspeakers, as they can easily cause over-excursion and subsequent damage. You can band-limit them as needed with an equalizer, or with a wave editor. They alternate in polarity, causing loudspeaker excursion in both directions. The files are 48 kHz/16 bit/Stereo for maximum compatibility with media players.
Quickie Gain Structure
In addition to listening tests, you can use these tracks to establish the gain structure of a signal chain. Here are the steps:
- 1. Feed the track to one channel of your mixer (input trim set at minimum).
- 2. Bring the main fader to “0 dB.”
- 3. Bring the channel fader to “0 dB.”
- 4. Advance the input trim until the mixer indicates near clipping at its output, as read on a peak meter or peak LED.
- 5. Make sure the pulse is not clipping the device after the mixer (usually a signal processor). If it is, then back off the input trim of the mixer until the clipping ceases.
- 6. Advance the power amplifier’s input sensitivity for the desired level, or until the amplifier indicates clipping, whichever comes first.v
It is important to set the amplifier last, after the signal is passing “full scale” through the other components. This process yields an optimal gain structure very quickly. The pulses don’t sound very loud, because they are very short in duration. This makes them less annoying to listen to than sine waves. Remember that sine waves pose a thermal damage risk to your loudspeakers, but pulses pose an over-excursion risk.
Again, be careful with these tracks. Used with care they are extremely useful. Used carelessly they can damage loudspeakers. pb
Download a PDF of this article.

