The Volume Knob Also Goes to the Left
A Tale of Loudness by Hadi Sumoro www.HXAudioLab.com
 This article is written by a keyboardist who is also an AV Professional who works in audio and acoustics. In common band language, he gives some great tips. Oftentimes, it’s the volume knob that is misused.
Foreword
As a keyboard player, over the last 10 years, I have completed over 600 public music performances as a part of a band and as a solo keyboardist. I have performed at over 50 different venues, both outdoors and indoors. For certain genres, it is typical for musicians to crank up the instrument and/or the sound system to output a certain loudness or sound pressure level (this will be abbreviated as SPL from here forward) for an optimum performance. This is, of course, subjective to each individual or group. On the other side, as a person who works in the audio and acoustics world, I have noticed a lot of audio and acoustics phenomenon that are associated with the loudness and which are interesting to share. This article is created to share my observations on the following topics to other fellow musicians:
- Several factors that commonly contribute to the loudness of a band
- Awareness of the loudness and sound quality especially in a small venue
- Compromises or solutions to keep the loudness under control
- Working with the soundman to run the event effectively
Since I mostly played in a band with a drummer who sings, an electric guitarist who also sings, an electric bassist and a conga player, the stories below will be about working and playing in this small world of the rhythm section performers. Sometimes, we also perform with a three-piece horn section as an addition to the band. Small to medium rooms are venues that we mostly encountered as a typical weekend bar/restaurant band. As a small band, we mostly perform with a small sound system without the help of a soundman.
Please note that the article does not aim to fully explain each topic in depth. The topics are discussed as an easy reading for fellow musicians who want to know more about audio and acoustics in a layman’s language and as practical as possible.
Recognizing the Loudest Instrument in the Band
From the user’s stand point, an electric instrument is the most flexible instrument in terms of the output. Electric/amplified instruments such as electric guitar, electric bass or electronic keyboards require an amplifier and a loudspeaker and each player is able to control the output by turning the volume knob left (counter-clockwise/softer) or right (clockwise/louder).
For acoustic instruments, it’s a different case. Drum, violin, piano, trumpet and voice are different acoustic instruments that do not share the same maximum loudness. For example, a drum set is typically louder than a violin. They certainly can’t compete with the amplified instruments without the help of a sound system, except for a drum set in a small room which may already have ample output for the whole venue.
So, let’s discuss the importance of recognizing the loudest instrument in the band.
Feedback
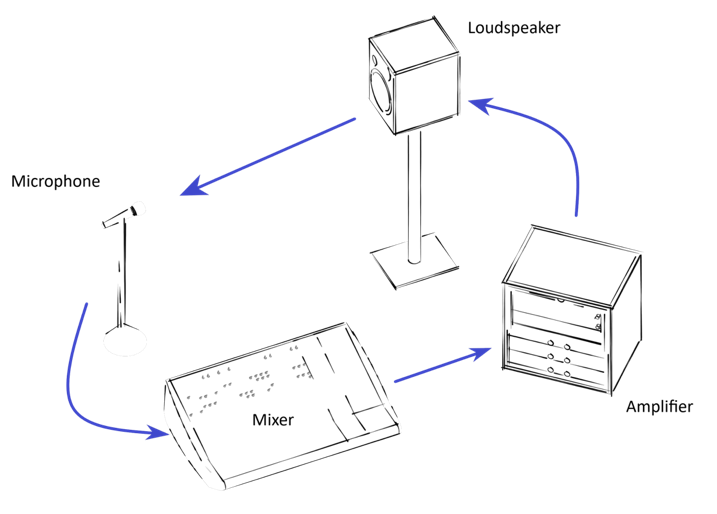
Feedback occurs when the amplified sound from any loudspeakers is recaptured by the sound system through any open microphone(s) and at some frequency the feedback signal exceeds the level at the microphone produced by the original source. At this point the sound system becomes its own dominant source of input. The amplified sound is then amplified repeatedly. Figure 1 shows the diagram how a feedback occurs.
In a typical small stage, the acoustic drum kit is most likely the loudest acoustic instrument in the band. Combined with the amplified sound from the guitar and keyboard, the total SPL generated in the stage can be very high. Remember, one microphone captures everything! Feedback problems can happen easily when the singer doesn’t place the microphone close to the mouth. Close means less than 10cm (4in). This is usually why an otherwise good sound system develops a feedback problem. When the singer places the microphone too far (more than 10cm), most likely the singer’s SPL is equal or lower than the background noise level at that microphone’s capsule location. The microphone then amplifies everything and can create feedback. So singers, please put the microphone close to the mouth at all times!
As mentioned in the previous paragraph, the total SPL on the stage can be the cause of feedback. By controlling the amplified instrument output and not banging on the drum too aggressively, the sound system will perform more effectively to distribute and amplify the sound. Keeping the SPL at a reasonable loudness will help with the feedback. We will discuss this more below.
Another common problem is cupping the microphone capsule with hand. This is typically done for two reasons: one is a reflex because of a feedback and two is to create a voice effect or just simply to look cool. This not only makes the mic sound terrible, it can also create feedback. Do hold a microphone by the handle, not by cupping or covering the capsule.
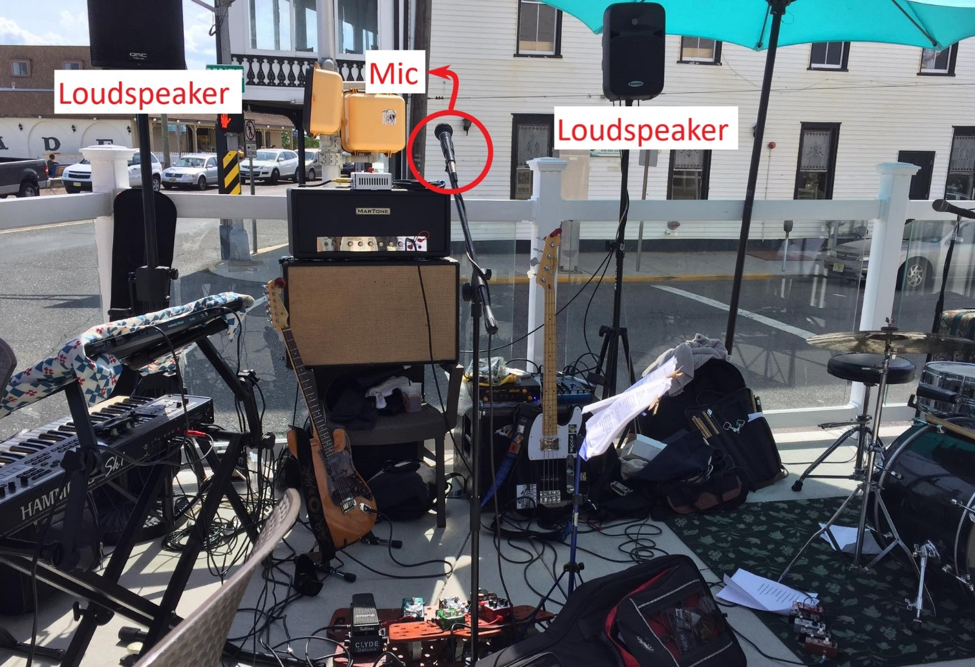
Another useful tip for singers is to be aware of where you are performing. A microphone aimed to the mouth can also be indirectly aimed at the loudspeaker. In a small band setup, typically loudspeakers are put on stands, at or slightly higher than the head. However, there are many cases where the loudspeakers are placed at the back of the performers due to the limited stage area. Figure 2 is a good example of this.
Placing loudspeakers behind the performers has a higher potential to have feedback, however as long as the singer keeps the mouth distance to the microphone’s capsule very close, this setup can be okay. This is because microphones have ears, not eyes. They really only care about level, not physical location.
A Guide for a Proper Self-Mix?
As a small band, we typically do a mix before we start playing and hope that the balance for each instrument translates well at the audience area throughout the show. We are pretty good at it and often receive compliments regarding the balance of our mix, even though we don’t have a soundman. This topic is also applicable for a good mix on the stage monitors, typically for a bigger stage.
The main problem mostly is … ego, although hearing loss can be a part of this. As a musician, I understand that to perform well as an accompanist or a soloist, each performer needs to be able to hear themselves well. The question is: how well?
In a typical stage monitor setup, during the sound check, the stage is most likely dominated by the acoustic drum and the bass amp sound. Depending upon where each musician stands, guitarists and keyboardists will ask for more of themselves in the monitor so they can hear well. Technically, to be able to hear well, each musician needs to hear their instrument slightly louder than all other sounds in the mix. This is the basic culprit! Let’s say the guitarist cranks up the volume until he hears well, the keyboardist may then crank up the volume to a level that is the same or higher than the guitarist. And the other musicians will ask for more of themselves in the monitor to compensate for the excess volume of the guitar/keyboard amps. Ultimately, this madness keeps going until the drummer needs to strike the drum harder, the singer needs to scream, and the sound system may not even be needed because the stage sound is already too loud in a small room. Well …?
Establishing a reference is the key point. First, all amplified instruments must back off and the drummer must understand how the drum sounds in the venue. This will be further discussed in the next section about acoustics. How many times have you been in a venue where the band plays great music without the audience being able to understand the words sung by the singer? Yes, the singer should be the reference. For instrumental bands or songs, the soloist or the main melody instrument should be the reference.
For a good self-mix in the monitor or the main system, one needs to establish an adequate SPL for the main singer without feedback. Typically the main singer’s loudness is at the same level of the overall acoustic drum’s loudness. Once this reference is set up, no other instruments shall exceed a level that balances with the main singer. Even at a solo section, the soloist shall only turn the volume up to the same level of that main singer. This can be easily achieved at almost any circumstances.
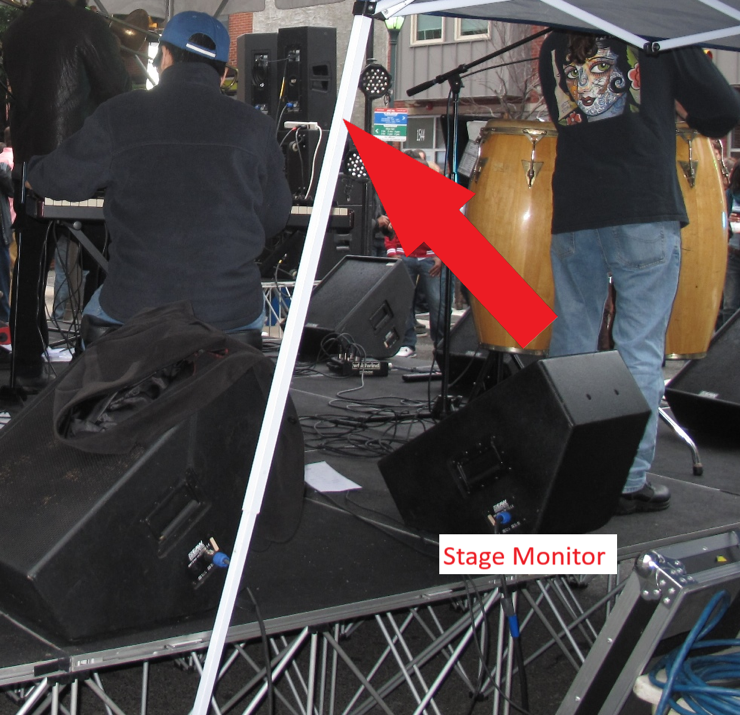
For keyboardists, it is important to setup the keyboard(s) in a way that you can directly see the stage monitors. When the stage monitor is below the keyboards and there is no direct line of sight to the monitor’s face, then the keyboards will act as a barrier to the sound from the monitor. This also means that you shall not put your jacket on the face of the stage monitor.
In figure 3, please note how I position myself relative to the stage monitor. The red arrow illustrates that the loudspeaker’s direct sound can reach my ears without any obstacles, or in other words I can directly see the loudspeaker’s face if I tilt my head to the right. This also applies for a drummer not to position the monitor behind the kick drum but on his/her left or right side. And lastly, orienting the stage monitor’s face so it is aimed to your head will further help.
Room Gain for an Acoustic Drum Set
One last subtopic about recognizing the loudest instrument is setting up the overall level of the main system or monitor output. As a keyboardist, I used my own loudspeaker on a stand as the main system and also monitor. When performing outdoors, I typically set my mixer master fader at -10dB. Once, we got rained out and moved to a small indoor bar. With the same setup, the keyboard output is too low! I had to push my mixer master fader to -3dB which is an additional 7dB output boost for the keys!
This happens because the room provides additional gain to the acoustic drum set, which most likely causes other performer to raise the volume of their instrument. If you are using a mixer that can save presets digitally, the outdoor and indoor presets will most likely look very different. It is important to notice how the drum loudness changes when moving from outdoors to indoors since the mix balance in a small venue will be somewhat controlled by the acoustic drum loudness. This will be explained further in the next section.
Bar/Restaurant’s Common Acoustics
We have all been to venues where the sound is mostly loud or even too loud to listen to. Of course the band can be the cause behind the excessive loudness of the music. However, as previously mentioned, the room can give additional gain, especially to the acoustic drum and bass sound.
Sound reflects off hard surfaces. The reflections will add to the total SPL and the perceived loudness. The reflected sound field happens when the surface materials are hard such as concrete, brick, gypsum, plywood, wood floor or other typical hard building materials. Absorptive materials, on the other hand, are typically puffy, soft and have porous. Newer engineered material allows sound absorption by a hard material, but this is rare to find in a typical bar/restaurant. This room gain will be somewhat controlled when there is a large surface area of absorptive materials. Two common absorptive material examples are ceiling tiles or carpets. The former is commonly found in a bar/restaurant.
The drummer will typically feel the difference inside a room with and without ceiling tile or carpet. It is helpful for the drummer to play the drum slightly softer than usual in a room without a large absorptive surface area. This will give good control of the feedback problem and make it easier to achieve a well-balanced mix for the main system or stage monitors.
One indoor place that is typically hard to play is a room with a high ceiling, and by high, I mean more than 4m (13ft) high. Figure 4 shows the bar area at Triumph Brewing Company in Princeton, New Jersey from two different angles. This room looks gorgeous and aesthetically pleasing, but it is not helpful for musical purpose. Not only does the room create a long decay time (long reverberation time) problem for each instrument, it also creates a clear repetition (echo) of the snare drum that can be heard. The acoustics can be destructive for specific music genres. Sadly, there is not much that can be done from the drummer’s perspective. Even playing the drum softer may not help much with the echo or reverberation problem. For a larger room, sometimes they provide a soundman who may put microphones on the drum. This can be a good thing because typical loudspeakers are directional (focuses sound to a certain direction, typically to the front) and a drum is omnidirectional (spraying sound everywhere). By playing the drum softer, the drummer may be able to minimize the destructive effect of the room and let the loudspeakers project the sound to the audience.
How about the bass? In a high ceiling large room without ceiling tiles, bass can be perceived as very bassy or muddy. It is generally useful to use an equalizer to cut some of the low (<100Hz) and/or low mid (100Hz – 500Hz) frequencies. The common misconception is to keep the bass fat and full out from the amp. Yes, this is correct if the bass goes directly to the main system via a direct injection (DI) box. However, for a smaller band where the bass amp is not routed to the main system, it is wise to always listen how the bass sounds in the room first (at least walk around the stage area and the front audience area) and then apply the appropriate equalizer setting to create a more pleasant sound in that venue. One preset for all won’t work.
Aside from using equalizer, a bass guitar’s tone can be controlled by the playing techniques. Like acoustic drums, bass guitar is very sensitive to picking hand dynamics. Reducing how hard you hit the strings can have a disproportionate effect on the overall sound, as will playing with a pick or fingers. In a large and reflective room, using a pick and watching how hard you hit the string can help produce a bass note that comes through the mix without adding too much loudness or muddiness.

Figure 4 – the right photograph is used with the permission (photograph by Taylor Photography). Left – a view from the second floor to the first floor, Right – another view of the room. The reader can notice the high ceiling and hard surfaces everywhere.
This article does not discourage the use of such rooms for a musical performance, but extra care needs to be taken to achieve a pleasant sound from both the musician and the soundman sides.
What Makes a Guitarist/Keyboardist Too Loud?
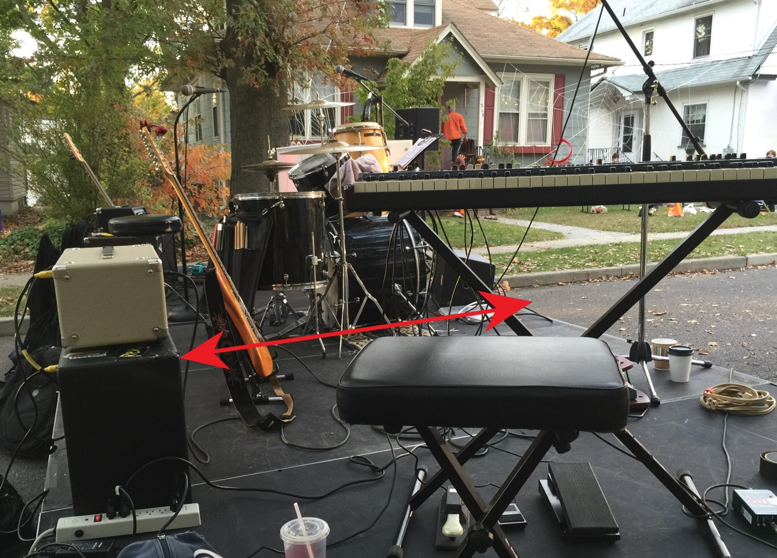
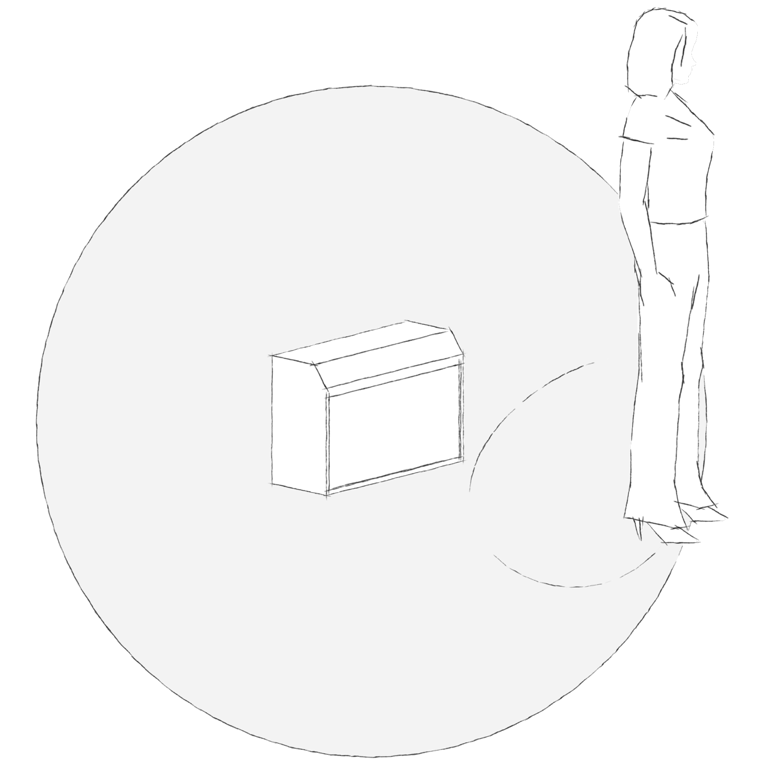
Figure 5 is a very typical placement of a guitar cabinet/amp (also applies for a keyboard amp) on the floor, where the guitarist stands 1m [3.3ft] in the front of it. What could be wrong?
In a small band situation, it can often happen that the guitar/keyboard amp sounds not only loud, but also ear piercing or too bright in the audience area. The placement of the amplifier is one of the main culprits. Please see figure 6. An illustration of a guitar cabinet/amp approximately 1m behind the performer’s position. Please note the sphere surrounding the amp and the ellipse near the player’s knee.
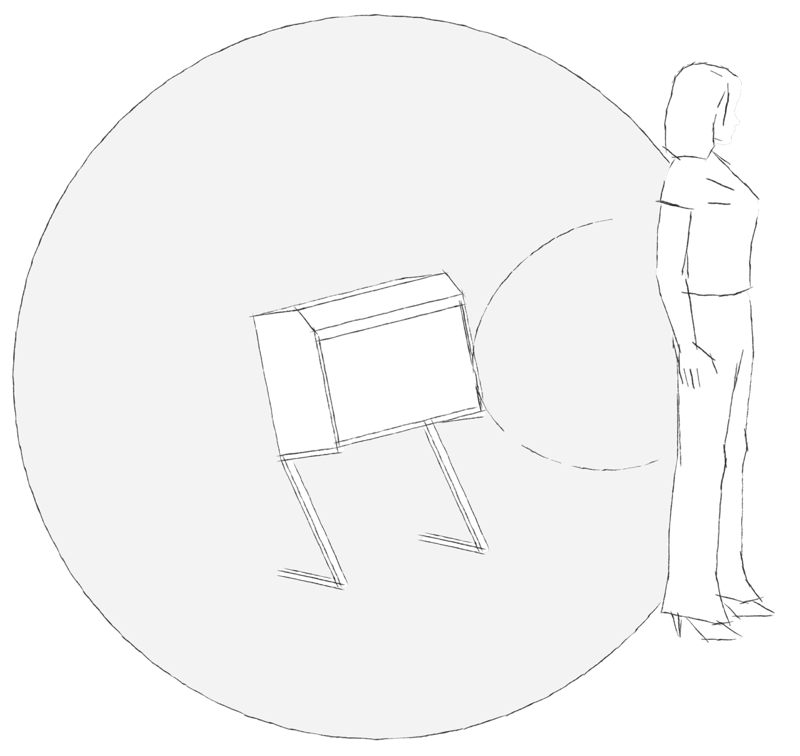
Think of sound dispersing as a sphere from one point in a space and growing larger. The sphere illustrates a typical low frequency’s sound dispersion of a loudspeaker and the ellipse illustrates an area where mid/high frequencies are typically concentrated. Right in the middle of the ellipse is usually called the on-axis point of a loudspeaker. The ellipse line denotes an area outside of which the mid/high frequencies drop by 6dB or almost half of the perceived loudness. The farther your ears are from the ellipse, the less mid/high frequencies you will receive from the loudspeaker’s direct sound.
By standing close to the amp on the floor, the mid/high frequencies do not travel to the ear of the guitarist. Majority of the mid/high frequencies hit the knee/thigh of the guitarist. To achieve the appropriate guitar sound at that position, a guitarist typically will boost the mid/high frequencies via the equalizer. The audience then receives a bright guitar tone and only the guitarist receives the correct guitar tone. It is very important for each musician to be able to monitor the sound as how the audience will hear it.
A simple solution to this problem is to elevate and tilt the guitar amp by using a guitar amp stand. Notice how the ellipse is projected closer to the ear in figure 7. This setup will ensure that the guitar tone heard by the guitarist is the same or similar to the one heard by the audience or reproduced by the sound system (if the amp is mic’d).
I also further explained this phenomena in an article I previously wrote entitled ‘Small Room and Loudspeaker Interaction’. It is available to download from www.HXAudioLab.com.
Note: mic’d means there is one or more microphone(s) used to amplify a certain sound source.
Is This Thing On?
As a band, we are often backed by a three piece horn section. The horns are usually mic’d individually. Since we are not helped by a soundman, it is necessary to get the balance right so the horns are not louder than the main singer. Prior to a show, the process of setting up the sound system includes testing individual microphones to make sure they are connected properly, all cables/connectors are working properly and there is sound coming out of the loudspeaker from each microphone. There is one caveat. How do you usually test the microphone? Typically by speaking into it: “test .. one two .. one two ..”. Let’s say the volume knob will end up to about 12 to 1 o’clock to get adequate loudness at the audience area. Then, the horn players come to the stage and they will be way too loud with this setup.
It is important to set up the volume knob when the appropriate instruments are playing. The human voice is not as loud as a horn even at 10cm (4in) away. Moreover, it is less likely that a vocalist will raise their voice to performance level volume when testing the microphones. With the voice, the channel’s volume knob was around 12 to 1 o’clock position, however after the final tweaking with the horn players, the volume knob will end up around 8 o’clock. That’s a huge difference!
Popping Sound
In a live sound situation, it is typical to use a directional microphone. Directional means capturing the sound from a certain direction. All directional microphones have something called the proximity effect. It’s the rise of low frequency when the sound source is closer to the microphone’s capsule. Most likely you get a thicker, muddier or warmer voice when a directional microphone is used for a singer. The problem is wind, especially from a plosive speech sound. The basic plosives in English such as d, g, b, t, k or p can result in a substantial ‘wind blow’ to the microphone’s capsule. This will create a popping sound in the sound system and can be very annoying.
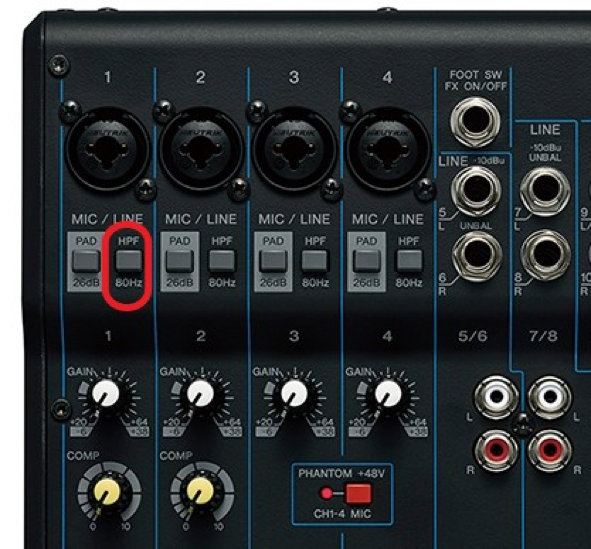
The human voice does not go much below 100Hz, so it is wise to always activate the high pass button on the mixer for the singer’s microphone channels. High pass or low cut or sometimes abbreviated as HPF on a mixer’s channel can be usually found near the preamp gain or on the top of the mixer’s channel strip. This button has a different corner frequencies in different type/brand of mixers, typically ranging from 60 – 100Hz. When the button is activated, then the mixer will filter out frequencies below the corner frequency. This helps to reduce the muddy sound, low frequency rumbles and also the popping sound in a sound system. Figure 8 shows a picture of Yamaha MG10XU mixer with the HPF button on the first channel circled in red.
When a band is using a compact mixer without HPF buttons on the channel strip, there is another possibility to lower the plosive sound, which is by turning down the low frequency equalizer knob. Foam wind screen can also be used to minimize plosive sound. However, these wind screens can also absorb a little bit of high frequency, making the voice a little dull. Turning up the high frequency equalizer knob can help with this problem.
Conclusion
Regardless of how expensive or top-notch the audio equipment is, a small band can still suffer audio and acoustics related problems. Understanding how to effectively use the sound system does not come only from one person, but from all performers.
A sound system’s job is to distribute sound to the audience. This includes amplification of the sound source. When the sound on the stage is way too loud, the use of a sound system can be restrictive and can fail to distribute the sound properly to the audience. Let the sound system amplify and distribute your sound by giving it adequate loudness and always remember, the volume knob also goes to the left.
This article is inspired by Thomas Max Guerin, the co-founder and bassist of New Pony. I would like to thank Pat Brown (www.ProSoundTraining.com), Riccardo Balistreri, Max Guerin and Chris Devenney for their insights and for reviewing this article prior to publication, and also to Eric Nutt (Sales and Operation Manager of Triumph Brewing) for the permission to use the Triumph Brewing’s photograph.

