Amplifier Sensitivity – Is Yours Optimized?
The amplifier’s gain/sensitivity switch allows you to minimize the noise floor of your sound system. Learn how to properly set it.
An amplifier has an input and an output. The output power rating gets a lot of attention, but this article is about the input.
I’ll examine a typical amplifier to discuss the input of this important “last device” in the signal chain, specifically the amplifier’s gain and sensitivity.
To characterize the amplifier’s input, we must first examine its output. My example amplifier carries the following power rating (Fig. 1).
600 W @ 8 ohms
800 W @ 4 ohms
That’s often where the discussion ends, but it is where I will begin.

Figure 1 – Front panel of a generic 600 W, 8-ohm amplifier.
How that rating is determined has long been a source of controversy in the various audio industries, but this article is not going to address that. What I am interested in from the rating is the amplifier’s RMS output voltage for a sine wave (usually 1 kHz). Rearranging the power equation yields 70 Vrms (Fig. 2). The sine wave is continuous, or it is for one of a string of “bursts” played through the amplifier. Ideally, the RMS value of each should be the same (Fig. 3).

Figure 2 – Expressing the power rating as a voltage.

Figure 3 – The waveform(s) used to test and rate the amplifier.
The Output Voltage as a Level
First, we need to express the amplifier’s output voltage as a level. I’ll use the amplifier’s 8-ohm rating. This is because it’s the minimum impedance for which most amplifiers can produce their maximum output voltage. When an amplifier’s output voltage drops due to excessive loading (too low load impedance resulting in excessive current draw), we should back off the level or reduce the load on the amplifier to return it to its linear operating range.
Expressing 70 Vrms as a level goes as follows:
dBV = 20 log (70) = 36.9 dBV
We’ll call it 37 dBV. This is the reference level for considering the input signal to the amplifier.
Sensitivity
The sine wave signal measured at the output was of course applied to the amplifier’s input. The level of this input signal is the amplifier’s sensitivity. In words, “this much in” (the input voltage) produces “this much out” (the output voltage).
The amplifier’s gain is the dB difference between these two voltages. More on that shortly.
Many (most) amplifiers have an attenuator on the front or back, usually in the form of a rotary control. This can be used to reduce the amplifier’s gain. Think of it as a turn down control, not a turn up control (Fig. 4).
The rated sensitivity is typically determined with this control at its maximum setting (0 dB or zero attenuation). This amplifier’s output voltage cannot exceed 70 Vrms for a sine wave, no matter the setting of this control. You can turn it down and still reach the amplifier’s maximum voltage. You’ll just need a higher input voltage to do it.

Figure 4 – Rear panel of example amplifier showing the gain switch and attenuator.
Switchable Sensitivity
Some amplifiers have a sensitivity switch along with the level control, usually in the form of Figure 5.

Figure 5 – Selector switch showing common values (A). The labels are sometimes simplified due to space constraints (B).
The switch does not change the amplifier’s maximum output voltage, but it does change the input voltage required to produce it. The setting determines the amplifier’s sensitivity, which can be calculated by subtraction since we converted the output voltage to a level.
37 dBV – 26 dB = 11 dBV (3.5 Vrms)
37 dBV – 32 dB = 5 dBV (1.8 Vrms)
The third setting of the switch is 1.2. This is not in dB. It’s a voltage. Setting the switch to 1.2 V makes this amplifier’s gain 35 dB.
G = 20 log (70/1.2) = 35 dB
So, start with the 8-ohm power rating, calculate the voltage, and convert to a level. The level (37 dBV in this example) is used to determine the amplifier’s gain and sensitivity. I’ve provided a table (Fig. 6).

Figure 6 – Table of values for each switch position. The values shown on the switch are highlighted.
The gain of the “1.2” setting depends on the output rating. In this example that setting produces the most gain. For a smaller amplifier the gain will be lower.
Some amplifiers have more choices than this 3-position switch, adding more control but also more confusion. The table reveals that “gain” switch and “sensitivity” switch are both appropriate terms.
What’s the Right Setting?
The switch has a simple purpose – to make the amplifier compatible with various types of audio gear. I’ll provide an example for each setting. The labeling, while potentially confusing, is driven by audio history and the variety of practices that have evolved over the past century.
“26” Setting
This setting allows the amplifier to function as a 26 dB “gain block.” No matter the input signal level, the output signal will be 26 dB higher, up to the maximum output level of 37 dBV.
If all amps in a rack are set for 26 dB, each produces the same output voltage when fed the same input voltage. The difference between the max voltage and actual voltage is headroom. The headroom is proportional to the amplifier size (Fig. 7).

Figure 7 – All amplifiers set for 26 dB of gain.
“32” Setting
This setting allows the amplifier to function as a 32 dB gain block. No matter the input signal level, the output signal will be 32 dB higher, up to the maximum output level of 37 dBV.
If all amps in a rack are set for 32 dB, each produces the same output level. A larger amplifier has more peak room. This setting has more gain (+6 dB) that the 26 dB setting (Fig. 8).

Figure 8 – All amplifiers set for 32 dB of gain.
“1.2” Setting
Professional line level is 1.23 Vrms. Historically this voltage is expressed as a level using a reference voltage that originated in the analog telephone era.
dB = 20 log (1.23/0.775) = 4 dBu (or “+4”)
This is the nominal RMS operating level of professional analog audio gear. It is a long established “best practice” for defining line level. An audio device, when operated at this RMS voltage, typically has an additional 20-ish dB of peak room. The maximum output voltage can vary from 20 dBu to 28 dBu depending on the manufacturer’s peak room philosophy, but +4 dBu is the nominal, or operating level.
Given a nominal level of +4 dBu and a maximum level of +24 dBu, when the gain switch is set to “1.2” the amplifier’s input sensitivity is about 20 dB higher than it needs to be.
24 dBu – 4 dBu = 20 dB
This “gain overlap” is okay and is easily reduced by the amplifier’s input attenuator. Some prefer to leave the attenuator maxed out and reduce the output level of the driving device (typically a signal processing stage). This allows a quick “return to normal” setting if someone tampers with the knob.
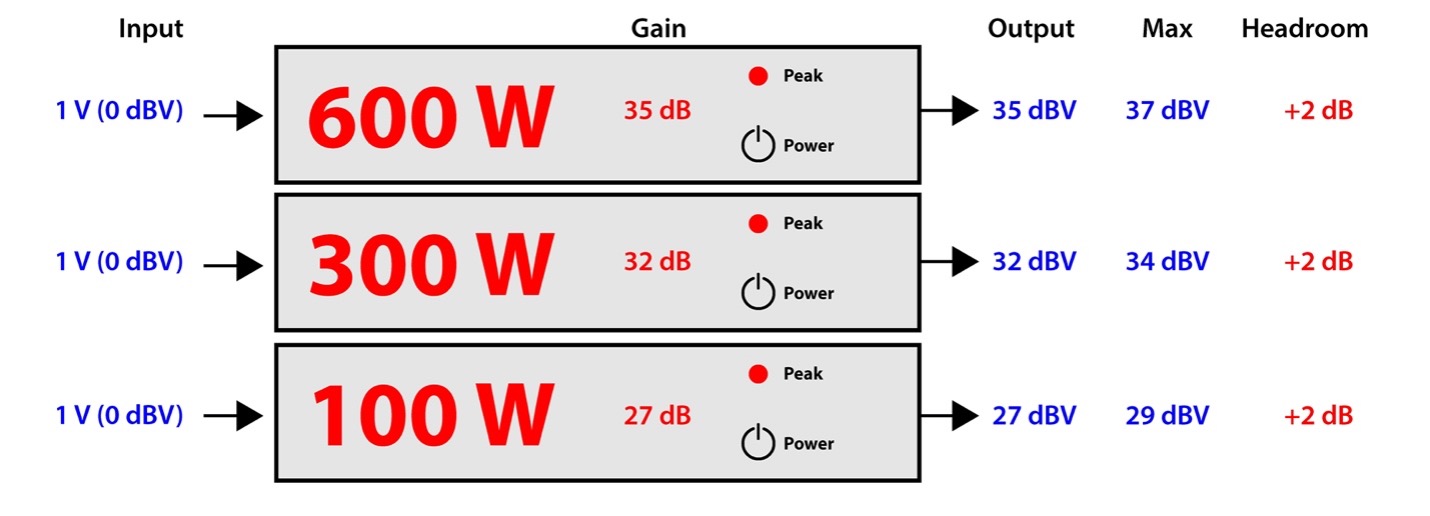
A rack of amplifiers with all set to 1.2 V results in the gain and output voltage being determined by the amplifier’s power rating. Swapping a 100 W amplifier out with a 200 W unit gets you 3 dB more output (Fig. 9).

Figure 9 – All amplifiers set for “1.2” sensitivity. The resultant amplifier gain is shown.
System Gain Structure
If you find this a bit bewildering, you are not alone, especially since it’s a common practice to just “max out” the amplifiers, ignore the sensitivity switch, and set the system operating level at the mixer or with a signal processing stage. This typically results in too much gain at the end of the signal chain, which forces bad gain structure practices early in the signal chain.
Symptoms include:
1. The mixer’s output fader is barely up.
2. The mixer’s output meter barely moves.
3. The system is excessively noisy.
This is backwards gain structure, and it can make the noise floor of the system audible at the listener.
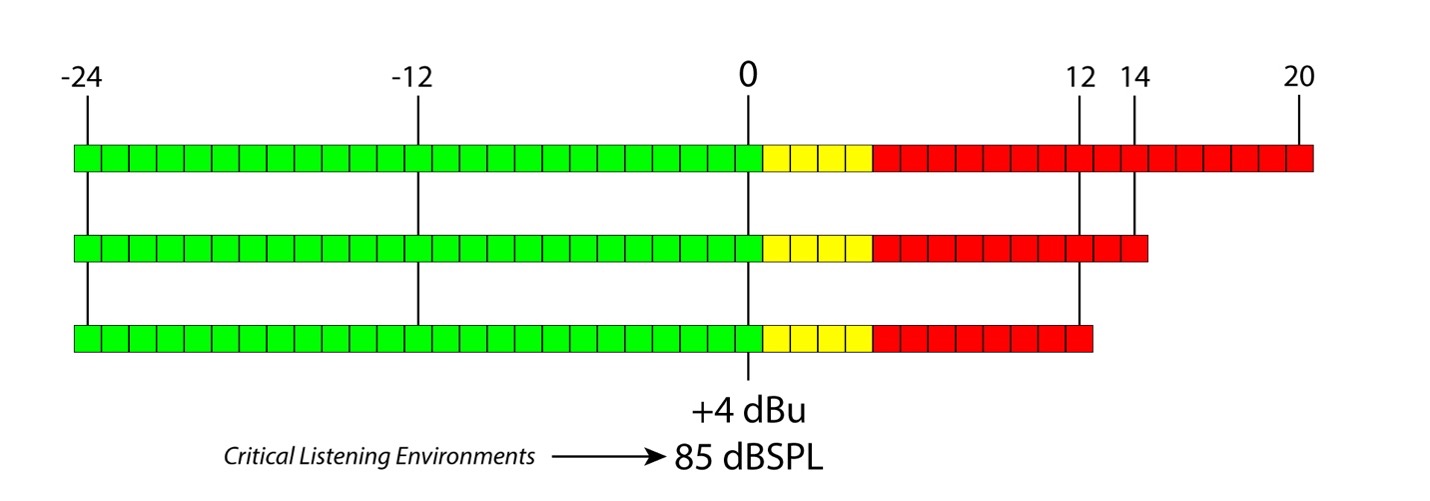
A better approach is to reference the system’s gain structure to the mixer’s output level. When operated at +4 dBu, the mixer has its maximum signal-to-noise ratio, with 20-ish dB remaining for signal peaks. The mixer’s meter may be marked with “0 dB” at or near this level if it is a volume indicator (VI), often called a “VU meter”. “0 dB” is the maximum RMS output level of the mixer that preserves 20 dB of peak room (Figure 10).

Figure 10 – Program meters using the K-Meter system as proposed by Bob Katz. Used in studios, it references the SPL at the listener to “0 dB” on the meter.
If the post-mixer signal processing is operated at “unity” (0 dB gain) then the mixer’s output level (+ 4 dBu) will be present at the amplifier’s input. At this point, we need to add enough gain to
A. Reach the amplifier’s full output level (peak light flashes), or
B. Reach the target SPL (appropriate loudness at the listener).
With proper amplifier selection you should reach the target SPL at or prior to the amplifier clipping.
Setting Up the Amplifier
A useful exercise is to turn the amplifier way down and toggle through the settings of the gain switch. You can easily determine the relative level change between the settings by listening or measuring with a voltmeter. Make a note of the gain change for each position (Fig. 11).

Figure 11 – Relative loudness change of each setting of the example amplifier.
If your amplifier has a sensitivity/gain switch, you’ll want to use the least amount of gain that produces the needed sound pressure level (SPL) in the audience. The higher the gain, the higher the system noise floor. The switch provides a coarse gain setting. The attenuator is for fine tuning. There are an infinite number of possible combinations so let’s establish a workflow to find the best one.
Here’s a quick gain switch setting routine that assumes that the mixer is producing line level (use pink noise) and the signal processing is at unity.
1. Minimize the amplifier’s attenuator setting.
2. Start with lowest gain switch setting.
3. Advance to attenuator to produce the target SPL. STOP if the amplifier clips.
4. If you can’t get there, select the next highest setting of the gain switch and repeat.
5. If you still can’t get there use the highest gain switch setting.
An alternate method is to repeat the above with the amplifier’s attenuator at 0 dB (maxed out), and the mixer’s output fader minimized. Use the fader to turn up the system. As with the previous method you want the lowest gain switch setting that allows the mixer to reach meter zero.
If you make it to the highest amplifier gain setting using either setting, examine your system gain structure to answer the question “Why do I need so much gain?”
Conclusion
The gain/sensitivity switch on an amplifier is there to help you achieve a better level match between the amplifier and the device driving it. There are many combinations that “work,” which is why the topic is controversial. The best setting is the one that produces the target SPL from the system with the least amplifier gain. This will produce the lowest noise floor that your system can have. pb
